[主題] Next.js上使用 Redux四兄弟
前言
身為使用 Vue.js的開發者,最近在研究 React.js以及 Next.js,原本以為有了使用 Vuex(和 Redux 一樣取自 Flux的概念發展出來狀態管理套件)的經驗,應該可以無痛轉移使用 Redux,但沒想到使用門檻竟然比預期的高上許多。
先是研究了 Redux,沒想到如果要打 Api還需要像是 React-Thunk之類的套件才能做非同步的操作。接著, Redux本身是一個獨立的狀態管理的套件,要怎麼跟 React溝通他也不管,所以還需要再安裝 React-Redux才能將 store和 Component做綁定。好不容易整理到一個段落了,實際開發 Next.js的時候還會有一個需求是要在 server-side從 context中取得 store又要再安裝 Next-Redux-Wrapper。前前後後含 Redux本身總共裝了四個套件,才終於達到我能開始開發 Next.js程式的最低需求。
就之前學習 Vuex的經驗,花比較多時間的地方也就只是觀念上的建立、以及實作上應用的技巧面;單就使用上,也就最一開始安裝進專案(其實也就是 cli工具架站時有選擇 Vuex而已)之後,弄懂 api文件幾乎就可以開始寫程式了。
但是學習 Redux就不太一樣了(也是學 React.js很多部份和學 Vue.js的學習經驗的差異),首先 Redux的寫法很有彈性,所以必須先清楚的理解其背後的觀念之後,融合文件上的說明搭配網路上不同人寫的文章,再整理出一個適合自己的寫法;接著是如同前面所說的,學習下一個套件再下一個套件,最後要把全部整合再一起又是另一回事,再全部整理出一個適合自己的寫法。
(兩天的生命又這樣沒了可以開始寫 code了~ QQ)
總之,反正我是順便做了筆記,雖然並不是很詳細完整,但是我把每一個我認為最基本且最小可行的程式碼紀錄下來,就按照我的步驟做,應該是可以很快建立基本的 Redux程式。
概念
Redux的資料流向無論同步還是非同步都只有一種(不像 Vuex的 View可以呼叫 actions(使用dispatch)及 mutations(使用commit)兩種)
資料流向:
View -> Actions -> Reducer -> State -> View
雖然說概念上只一種資料流,但實作上 Action還是分為「同步」和「非同步」兩種的做法。Redux原生 dispatch是直接呼叫 reducer,所以無法執行非同步的操作( reducer中非同步操作是被禁止的),要額外搭配 Redux-Thunk才能使用非同步的操作
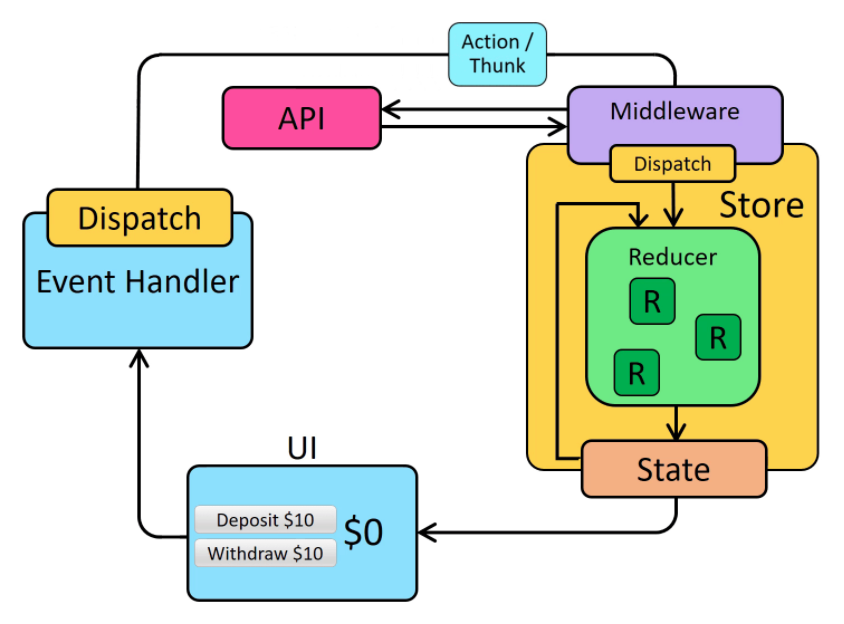
(圖片取自官網)
實作上所必要的套件有以下四個:
Redux:狀態管理本身
Redux-Thunk:實作 middleware處理非同步行為(Redux本身是不允許處理非同步的)
React-Redux:將 Redux跟 Component綁定(提供Provider將 state及 dispatch傳入 Component)
Next-Redux-Wrapper:Next.js在 server-side或者 static-site的 build-time中取得 store
不錯的文章,但文章的 React-Redux部份是舊版的寫法
https://chentsulin.github.io/redux/index.html
State & Reducer
- State:
state是唯讀的,改變state唯一的方式是發出一個action - Reducer:取得先前的
state和一個action,並回傳下一個state
最簡易範例:
// state
const initState = {
  otherState: 'otherState',
  todoList: ['first'],
};

// reducer
const reducer = (state = initState, action) => {
  switch (action.type) {
    case 'ADD_TODOLIST': {
      const todoList = state.todoList.map(d => d);
      todoList.push(action.payload.listName)
      return {
        ...state, // 因為要更新所有的 state,所以必須先將原本的 state解構
        todoList,
      };
      /* 或者 return的寫法也可這樣
      return Object.assign({}, state, {
        todoList
      })
      */
    }
    default:
      return state;
  }
};
其中要注意的:
reducer在更新state的時候並不能只更新特定欄位,必須更新整個state tree,所以要注意 return的寫法reducer本身不能做非同步的操作,否則會噴錯誤訊息
處理多個 action的範例:
function todoApp(state = initialState, action) {
  switch (action.type) {
    case SET_VISIBILITY_FILTER:
      return {
        ...state,
        // 略
      }
    case ADD_TODO:
      return {
        ...state,
        // 略
      }
    default:
      return state
  }
}
拆分 Reducers:
Redux提供一個 utility叫做 combineReducers(),可以簡單的將多個 reducer合併
import { combineReducers } from 'redux'

const todoApp = combineReducers({
  visibilityFilter,
  todos
})

export default todoApp
Action
action 是一個要傳遞資料給 store的 payload資訊(透過store.dispatch()),其定義事件要做的事情,格式可自行定義,一般來說會長這樣:
export const ADD_TODO = 'ADD_TODO'

const action = {
  type: ADD_TODO // Reducer的type名稱
  payload // '要傳遞的資料'
}
當 Views要跟 store溝通,最簡易的寫法就是 store.dispatch(action),例如:
store.dispatch({
  type: 'ADD_TODO' // Reducer的type名稱
  payload // '要傳遞的資料'
})
Action Creator
action creator和 action很容易被混為一談,action creator 是產生 action的 function
export const ADD_TODO = 'ADD_TODO'

export const addTodo = (payload) => {
  return {
    type: ADD_TODO,
    payload
  }
}
由 View發出 dispatch時的寫法:
dispatch(addTodo(payload))
Async Action Creator(使用Redux-Thunk)
Redux原生是禁止非同步操作的,搭配 Redux-Thunk 套件我們可以用來製作 「非同步的 Action Creator」。當一個 action creator回傳的不是物件(也就是 action)而是一個 function時,該 function就會被 Redux Thunk middleware所執行。
關於這個 async action creator所以回傳的 function:
執行完非同步的操作後調用
distach不需要是 pure function,也可以做其他的操作,這讓我們也可以用來開發更複雜的非同步控制流程
範例:
const fetchData = (data) => {
  return (dispatch) => {
    // 不需要是 pure function,也可以做其他同步的操作
    dispatch({
      type: 'ANOTHER_ACTION'
    })

    return fetch('http://www.website.com/api/todolist.post', {
      method: 'POST',
      body: JSON.stringify(data)
    }).then(response => response.json())
      .then(response => {
        dispatch({
          type: 'ADD_TODOLIST',
          payload: response
        })
      }))
  }
}
Views中發出 dispatch的寫法:
store.dispatch(fetchPosts('reactjs')).then(() =>
  console.log(store.getState())
)
store
createStore 寫法範例
import thunkMiddleware from 'redux-thunk'
import createLogger from 'redux-logger'
import { createStore, applyMiddleware } from 'redux'
import rootReducer from './reducers'

const loggerMiddleware = createLogger()

const store = createStore(
  rootReducer,
  applyMiddleware(
    thunkMiddleware, // dispatch() function
    loggerMiddleware // log action
  )
)
常用 Methods:
getState()
dispatch(action)
subscribe(listener)
React-Redux
React-Redux 是 react跟 redux溝通用的套件,舊版主要是以connect 函式將 state和 reducer注入Component,v7.1.0之後的版本提供 Hooks語法,使用方式比以前簡單很多
官網文件
https://react-redux.js.org/api/hooks
不錯的介紹
Provider設定
// app.js
import { createStore } from 'redux'
import { Provider } from 'react-redux'
import reducer from '@/store/reducer.js'

const store = createStore(reducer)

const App = () => {
  return (
    <Provider store={store}>
      <Main />
    </Provider>
  )
}
React 和 Store 溝通主要是 state和 action,React-Redux提供了 useSelector以及 useDispatch,範例如下:
import { useSelector, useDispatch } from 'react-redux'

const Page = () => {
  const todoList = useSelector(state => state.todoList)
  const dispatch = useDispatch()
  // 略
}
next-redux-wrapper
Redux 使用在 Next.js上時,server-side 取用網站的 config或者 state資料都需要透過 context來取得,但是 Redux的 store是沒有在 context內的,這時候我們就需要額外安裝 next-redux-wrapper
依賴 react-redux套件,並且要注意版本在 v7.x以上
首先有個小坑要注意,使用 next-redux-wrapper之後,雖然仍然使用 react-redux的 useSelector及 useDispatch來跟 Store溝通,但react-redux的 Provider就不需要加上去,否則 state的更新上會出現 bug。
- store.js
// store.js
import { createStore, AnyAction, Store } from 'redux';
import { createWrapper, Context, HYDRATE } from 'next-redux-wrapper';

// create your reducer
const reducer = (state = {tick: 'init'}, action) => {
    switch (action.type) {
        case HYDRATE:
            // Attention! This will overwrite client state! Real apps should use proper reconciliation.
            return {...state, ...action.payload};
        case 'TICK':
            return {...state, tick: action.payload};
        default:
            return state;
    }
};

// create a makeStore function
const makeStore = (context) => createStore(reducer);

// export an assembled wrapper
export const wrapper = createWrapper(makeStore, {debug: true});
getStaticProps或 getServerSideProps 發出 dispatch時 type為 HYDRATE
- app.js
import React from 'react';
import { wrapper } from '../components/store'

const WrappedApp = ({ Component, pageProps }) => (
    <Component {...pageProps} />
);

WrappedApp.getInitialProps = wrapper.getInitialPageProps(store => ({ Component, ctx }) => {
  // 略
})

export default wrapper.withRedux(WrappedApp)
關於 getInitialProps、getStaticProps、getServerSideProps 等的寫法參考官方文件:
https://github.com/kirill-konshin/next-redux-wrapper#server-and-client-state-separation
- reducer
reducer的設定是其中比較神秘的部份,必須在 reducer 的 function裡 switch-case的「最上方」(也就是要在第一個做判斷)增加判斷 action.type為 HYDRATE,就我的理解這個是在getStaticProps或 getServerSideProps 執行時會自動被 dispatch,要在這邊更新 server-side(或者 static site的 build-time)中的 state。
此時 action裡會有一包 payload物件,裡面是更的 state,要用他來取代表舊的 state。
如果 reducer是最外層的話(rootReducer),寫法範例如下:
import initState from './state.js'
import { HYDRATE } from 'next-redux-wrapper'

export const reducer = (state = initState, action) => {
  switch (action.type) {
    case HYDRATE: {
      return {
        ...state, // 原本的 state
        ...action.payload // 更新的 state
      }
    }
    // 略… 其他 case
要注意的是,即使該 reducer並不是對應到 state-tree最底層(比如使用了 combineReducers),reducer中注入的 state及 action.payload卻仍然是最底層的 state,所以這時候就要注意回傳 state-tree的節點位置
// store.js
import { createStore } from 'redux'
import { combineReducers } from 'redux'
import { createWrapper } from 'next-redux-wrapper'
import auth from './auth/reducers.js'

const makeStore = (context) => createStore(
  combineReducers({
    auth
  })
)
export const wrapper = createWrapper(makeStore, { debug: true })

// reducer.js
import initState from './state.js'
import { HYDRATE } from 'next-redux-wrapper'

const auth = (state = initState, action) => {
  switch (action.type) {
    case HYDRATE: {
      return {
        ...state.auth, // 注意!要回傳正確的 state-tree的節點位置
        ...action.payload.auth // 注意!要回傳正確的 state-tree的節點位置
      }
    }
    // 略… 其他 case
  }
}

export default auth